Using OpenOCD + RPI Pico + RTT with a STM32

Since I discovered about Segger Real Time Transfer (RTT) years ago I became a fan of it, it has almost no down-points and delivers a fast and resourceful way to interact with the firmware, I’ve been using it at work for years and have nothing but love for it.

Now, after many years, OpenOCD has finally integrated RTT support on its latest version (V0.11.0), allowing us to use RTT with any supported HW interface and independent from any Segger HW or PC SW, this is really exciting and I decided to give it a try, here I describe my experience.

RTT test firmware and target

First, to be able to test it, I created a simple STM32 FW using STM32Cube and included the Segger RTT library, here is the relevant code:

while (1)
  {
	  static int counter = 0;
	  
	  HAL_GPIO_TogglePin(LED_GREEN_GPIO_Port, LED_GREEN_Pin);
	  SEGGER_RTT_printf(0, "RTT counter: %d\n",counter++);
	  HAL_Delay(500);

  }

Then I flashed it on a Nucleo Board (NUCLEO-G071RB), that will be used for testing.

Using it with a ST-Link

I started making it work with Nucleo’s embedded ST-Link, how I am on Linux and the apt repository is still on the old version, I started by compiling and installing OpenOCD V0.11.0 on my machine:

First I solved some dependencies listed on the official documentation and then compiled and installed it with the following sequence of commands:

git clone https://github.com/ntfreak/openocd
cd openocd/
git checkout v0.11.0
./bootstrap
./configure
make
sudo make install

Then I spent some time reading the documentation and created the following config file:

source [find interface/stlink-v2.cfg]
source [find target/stm32g0x.cfg]
init
rtt setup 0x20000000 36684 "SEGGER RTT"
rtt start
rtt server start 9000 0

This config file sets the ST-Link as interface, the STM32G0 as target, and also:

  • Setup the RTT block search to be conducted starting from address 0x20000000 (STM32’s start of SRAM), for 36K bytes (SRAM size), and searching for the “SEGGER RTT” block ID, which is the default ID used by Segger’s library.
  • Start the RTT search
  • Start the RTT TCP server for RTT channel 0 (default one) on local port 9000

Then I started openOCD with the config file:

openocd -f stlink_rtt.cfg

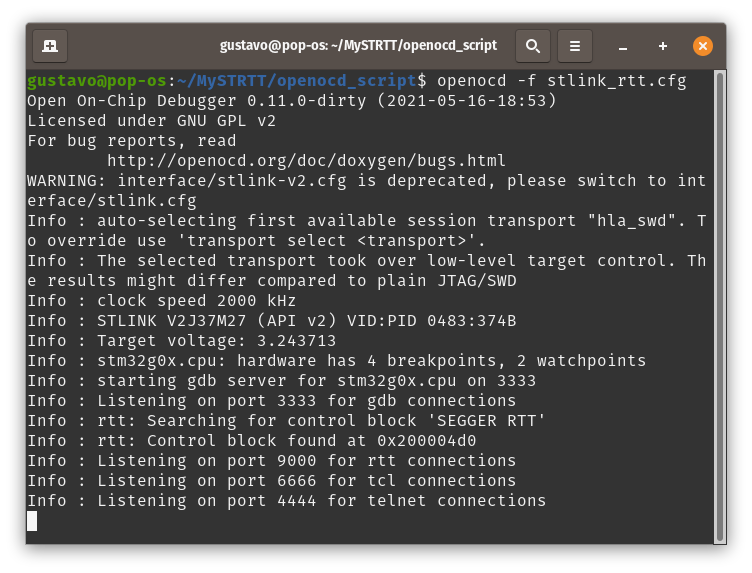
As shown, it found the RTT control block on address 0x200004d0, so we are good, now we should be able to capture RTT packets on the local TCP port, using, for example, netcat:

nc localhost 9000

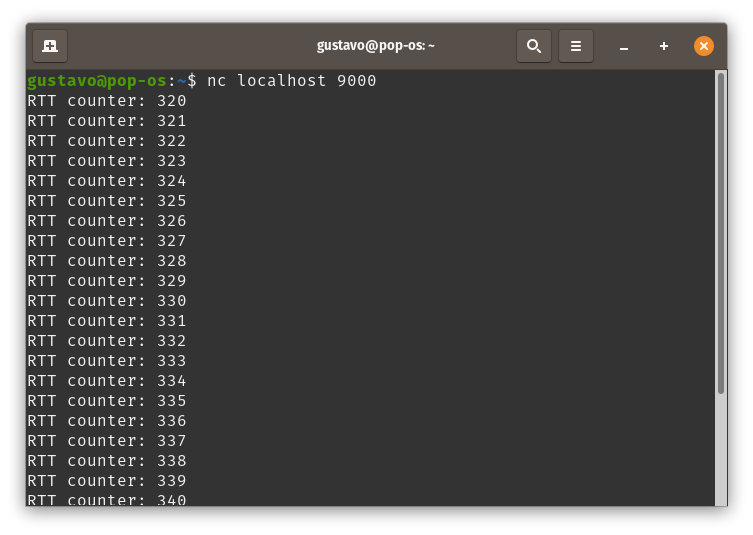
Bingo, we have RTT using a ST-Link as interface!

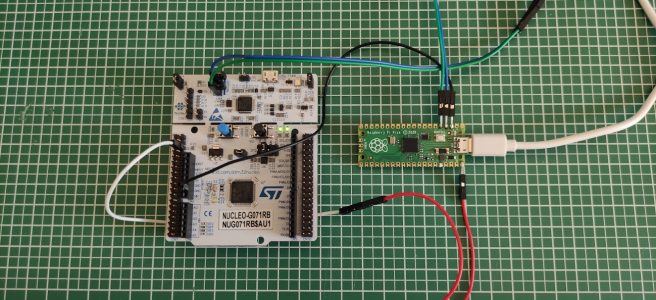
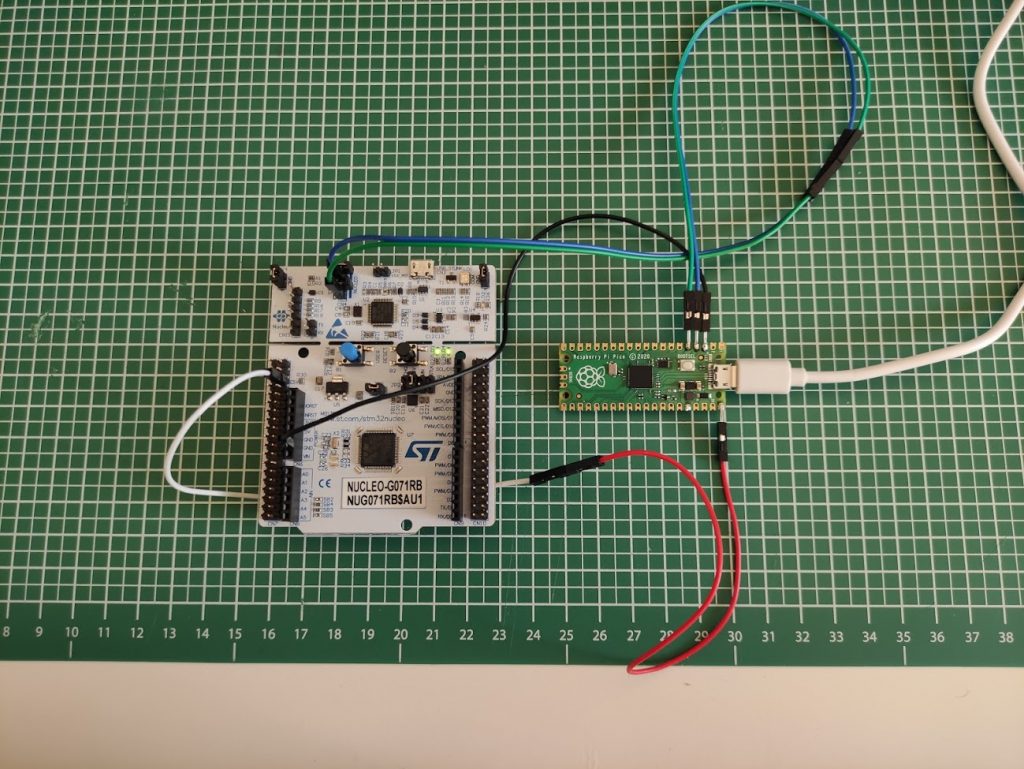
Using a Raspberry Pi Pico as CMSIS-DAP SWD interface

After having success using the ST-Link I decided to try using a Rpi Pico as interface, as I saw on Pico’s documentation that they have an official firmware for it, named “Picoprobe”, but after some reading I learned that they implemented their own interface protocol and therefore it requires to use their own OpenOCD’s fork, unfortunately this fork is based on V0.10 and does not support RTT.

Then, searching a bit more, I found that someone (@majbthrd) already ported the CMSIS-DAP interface firmware to the Pico, giving us a ready firmware to be used, so lets try it:

First we need to clone the repository and compile it:

git clone https://github.com/majbthrd/DapperMime
cd DapperMime/
git submodule update --init --recursive
make BOARD=raspberry_pi_pico all

Then, we need to flash the resulting binary into the Pico, this is quite trivial with Pico’s built-in UF2 bootloader, just connect the pico to the PC while holding the boot button and copy the .uf2 binary (found inside build folder) to the Pico’s disk.

Now, we need to make sure that OpenOCD is able to use a CMSIS-DAP as interface, in my case it was not included by default on my last compilation and installation, so I needed to solve some dependencies and recompile it:

The main dependency was the missing HIDAPI lib, so I compiled and installed it:

git clone https://github.com/libusb/hidapi
cd hidapi
./bootstrap
./configure
make
sudo make install

Then I recompiled OpenOCD with CMSIS-DAP support and reinstalled it:

cd ~/openocd
./configure --enable-cmsis-dap
make
sudo make install

Now we create a new config file, similar to the previous one but specifying CMSIS-DAP as interface:

source [find interface/cmsis-dap.cfg]
source [find target/stm32g0x.cfg]
init
rtt setup 0x20000000 36684 "SEGGER RTT"
rtt start
rtt server start 9000 0

Then we connect the Pico board to the target, following the same pinout used by the official Picoprobe fw, Pico GP2 -> SWCLK and Pico GP3 -> SWDIO:

And start again OpenOCD, passing this new config:
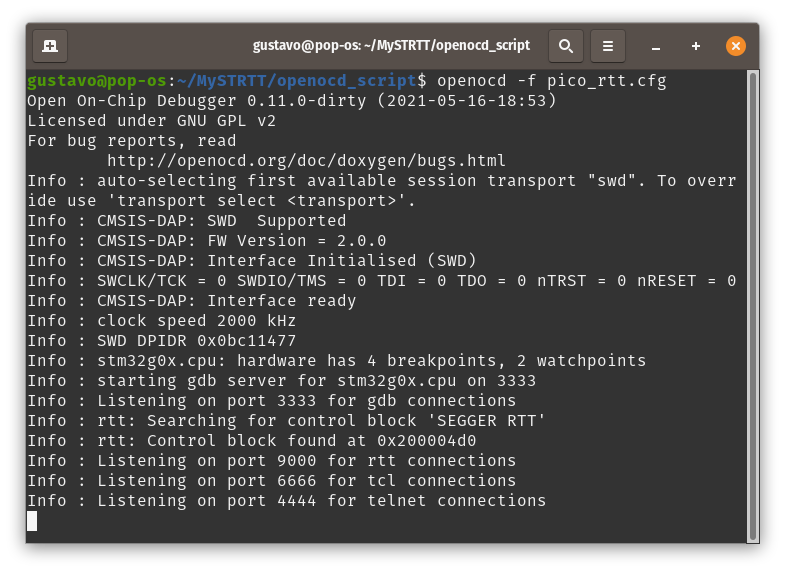
Bingo! It works!
Now we can use a Raspberry Pi Pico as a generic CMSIS-DAP SWD interface, for both debugging and collecting RTT data 🙂

Quick tip: How to connect to Bluetooth SPP (serial port profile) devices in linux

First, scan to find the MAC address of the device:

hcitool scan
Then, use the rfcomm command to connect to the specified MAC: (it must be as root):
sudo rfcomm connect /dev/rfcomm0 AA:BB:CC:DD:EE:FF 1
This will create the rfcomm0 file inside your /dev/
Now just use any terminal to write to and read from it:
picocom /dev/rfcomm0
or just write to it using echo:
echo “Test” >> /dev/rfcomm0
no baud-rate information is needed, as is the Bluetooth that dictates the speed

Quick tip: finding IP address of a PI connected thru Ethernet to your computer (with Ubuntu)

If you need to configure a wireless connection to your board but don’t want to wire it to your router (because you are lazy like me), you can connect it directly to your computer with an Ethernet cable  and SSH it:

Connect the board to your computer with an Ethernet cable

Open the terminal and execute
nm-connection-editor

Go to the Wire Connection Settings > IPv4 Settings
change Method to “Shared to other computers”, and save it

Now open the terminal and run
cat /var/lib/misc/dnsmasq.leases

You will get the board IP there:

With this IP you can SSH the board and configure the wireless connection, in my case using tools like nmtui or armbian-config


Automatic fan control on the OrangePi PC (or others Linux SBCs)

Hi,

Here is an overview of how I added automatic fan control to my OrangePi PC running Armbian Bionic.

The hardware

My OrangePi PC was already equipped with case and fan:

To control the fan I added a small transistor interrupting the fan ground wire with a base resistor to the cable, then connected it to one of the GPIO pins:

GPIO Control

The next step was figuring out how set/reset this pin, first i went to the OrangePi PC schematics and found which GPIO it was:

After searching for ways to control the GPIO and experiencing with some packages, I decided to do it directly accessing the kernel’s sysfs (although this is already deprecated, as stated here, it works and is the easiest way to access GPIOs from userspace/bash).

For using the sysfs, first we need to calculate the GPIO number based on this formula:

(position of letter in alphabet - 1) * 32 + pin number
(found here)
Which, for PD14, will give us: 3*32+14 = 110
Then we need to configure it:
echo 110 > /sys/class/gpio/export
echo out > /sys/class/gpio/gpio110/direction
And then we can control it with:

echo 1 > /sys/class/gpio/gpio110/value #for turning on
echo 0 > /sys/class/gpio/gpio110/value #for turning off

Reading the temperature

Reading the processor’s temperature on the Armbian Bionic is pretty straight, we just need to read the file “temp” from /sys/devices/virtual/thermal/thermal_zone0/, but it will give us the temperature in “millidegree Celsius”, which is way more than we need, so a easy solution is to just get the first 2 characters from it using cut:
cat /sys/devices/virtual/thermal/thermal_zone0/temp | cut -c 1-2

Putting all together in a script

Now that I already know how to deal with the GPIO and the temperature, I put everything in a script named fan_control.sh:

 1
 2
 3
 4
 5
 6
 7
 8
 9
10
11
12
13
14
15
16
17
18
19
20
21
22
23
24
25
26
27
28
29
30
31
32
33
34
35
36
37
38
39
40
41
42
43
44
#!/bin/bash

echo 110 > /sys/class/gpio/export
echo out > /sys/class/gpio/gpio110/direction

th_on=60
th_off=50

echo $(date)" FAN Control (1.0) >> ON: $th_on / OFF: $th_off"

clean_up() {

 # Perform program exit housekeeping
 echo 0 > /sys/class/gpio/gpio110/value
 echo 110 > /sys/class/gpio/unexport
 echo $(date)" FAN Control terminated."
 exit
}

trap clean_up INT TERM

while [ "1" = "1" ]
do
temp=`cat /sys/devices/virtual/thermal/thermal_zone0/temp | cut -c1-2`
state=`cat /sys/class/gpio/gpio110/value`

# echo "Temperature: $temp"
if [ $temp -ge $th_on ]
then
if [ $state = 0 ]
then
echo $(date)" Fan started: $temp"
echo 1 > /sys/class/gpio/gpio110/value
fi
elif [ $temp -le $th_off ]
then
if [ $state = 1 ]
then
echo $(date)" Fan stopped: $temp"
echo 0 > /sys/class/gpio/gpio110/value
fi
fi
sleep 2
done
In lines 11-20 we set a trap to be able to turn off the fan when the script is finished,  in lines 22-44 we run the main loop, collecting the FAN state and temperature (lines 24 and 25), checking if it is higher or lower both thresholds (lines 28 and 35), and only acting if the fan is not already turned of or off (lines 30-34 and 37-41), and after the iteration it goes in sleep for 2 seconds (line 43).
Does not forget to make the script executable with:

chmod +x fan_control.sh

Making it run automatically

For setting it to run on boot, first I needed to figure which initsystem my board was running, for finding it we can do:

1
sudo stat /proc/1/exe
Now we know we are dealing with systemd, in this case the best way to start our script on boot is setting it as a service, for doing it I created a fan.service file with the following content:
[Unit]
Description=Control of the CPU Fan

[Service]
Type=simple
ExecStart=/root/fan/fan_control.sh
Restart=always
RestartSec=30
SyslogIdentifier=FAN

[Install]
WantedBy=multi-user.target

This service descriptor is setting our script to start on boot and keep it always running, if the process dies for any reason the systemd will restart it after 30 seconds.

For registering this service, you will need to do the following steps:

# create a symbolic link of the service file inside systemd/system folder
ln -s /root/fan/fan.service /etc/systemd/system/fan.service
# Install/enable the service, this will make systemd already start it on the next boot
sudo systemctl enable fan.service
# (optional) start the service 
sudo systemctl start fan.service

# check the service status
systemctl status fan.service

This is an output of the status reading after installing and starting the service:

Testing it

If you want to test it the easiest way is stressing the CPU, for this, the following script can be used:

# start 4 jobs to use CPU and keep then in background
for i in 1 2 3 4 ; do nice -n 20 cat /dev/zero > /dev/null & done 

# kill all started jobs in background
for pid in $( jobs -p ) ; do kill -9 $pid ; done
(from here)

You also can find all files and a short guide in my github repository:
https://github.com/gustavolaureano/orangepi_fan_control

That’s it, see you next time 🙂

Pages used as research source:
https://www.digitalocean.com/community/tutorials/understanding-systemd-units-and-unit-files
https://gist.github.com/fcangialosi/45701b95f7436049a6390fecf3c9b8a1
http://linuxcommand.org/lc3_wss0150.php
http://hilite.me/

T.I.L.: Literals comparison in C thru pointer equality

While analyzing the Zephyr OS source code I found the following routine:

Which do device binding using device’s name (in string format) as parameter, and it’s interesting because it first tries to find a match comparing the string’s addresses, only in the case of no matching it does the classic strcmp approach as fallback.

This is clever because it assumes that if the two strings are literals (I.E. compiler-time defined) the compiler will allocate it only one time in ROM (even if the string was defined multiple times in code) and the address comparison will be valid (although this behavior is not language defined and could not be optimized by the compiler, today this is standard in every major compiler like GCC).

Additional information and discussion:
https://stackoverflow.com/questions/11144118/c-compare-two-string-literals
https://stackoverflow.com/questions/3289354/output-difference-in-gcc-and-turbo-c

How to redirect QT’s “Application Output” to a console window outside QT Creator

Hi,

I was having a problem with my application where a signal was not being connected to a slot, but I was not able to see why because the part of the application where it was happening was dependent on an external device, which was only connected to another computer without QT Creator installed.

After some search, I found that remote debugging would be a good option, but information about how to setup it in windows machines was hard to find, and the lack of experience in similar questions made me quit the idea.
Then I found a simple way to redirect the application output (where all warning and error messages of the QT are printed) to a new console window that is opened together with the application, here are the steps:

Add “CONFIG += console” to your QT project file (name_of_the_project.pro), like this:

Then save the file and do the following:

  • Clean Project (in Build menu)
  • Run qmake (in Build menu)
  • Rebuild Project (in Build menu)
After this, your executable will open along with a console window where all debug messages will be printed, BUT when running from QT Creator you will still get the debug messages from the “application output”, to avoid it and get the console window even when running from inside QT Creator, go to “Projects” in the left side of the screen, select “Run” in the “Build & Run”, and mark the “Run in Terminal” checkbox.